Signalis | How to open the 5 Lock Door

Signalis is a game with quite a few puzzle elements in it, and one of the earlier head-scratchers is the 5 Lock Door that you find in the Waiting Room. It’s clear you need to open the door to progress, but doing so isn’t immediately obvious.
But do not worry, here at God is a Geek, we’ve got you covered, and we’ll show you how to open the 5 Lock Door in Signalis.
Signalis | How to open the 5 Lock Door
Fundamentally to open the 5 Lock Door, you, perhaps unsurprisingly, need 5 different Keys. These are the Fire Key, the Water Key, the Gold Key, the Air Key, and finally the Blank Key.
Jump to Key:
Fire | Water | Gold | Air | Blank
Fire Key
The first key you’ll need to solve the 5 Lock puzzle in Signalis is the Fire Key. To get close to the Fire Key, you’ll need to get into the Incinerator Room which is North of the Morgue. However, the door is locked, so you’ll need to find the Incinerator Room Key. To get this, you’ll need to snoop around the Waiting Room itself for a document with a clue on how to access the Sword Safe.
The document looks like this:
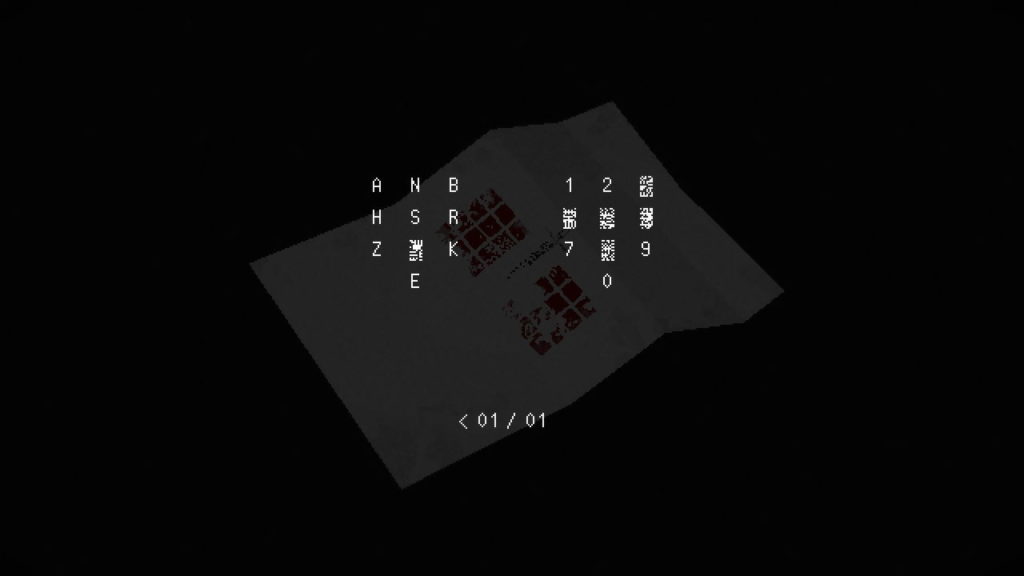
This means if we match the placement of the letters to the standard keypad numbers we can deduce the following:
A=1, N=2, B=3, H=4, S=5, R=6, Z=7, ?=8 K=9, and E=0
We don’t know what 8 is because that letter is scribbled out. Annoyingly, when we refer to Radio Frequency 237 for our Sword Safe code, we find out it is:
19386
Which would translate to:
AKB?R
So now we need to find out the missing letter, and we can crack the Sword Safe. To do that, we need to actually locate the Sword Safe. It is found in the Nurse Station which is the far-right North exit off of the East Corridor.
When there, and you inspect the safe, you will see these options:
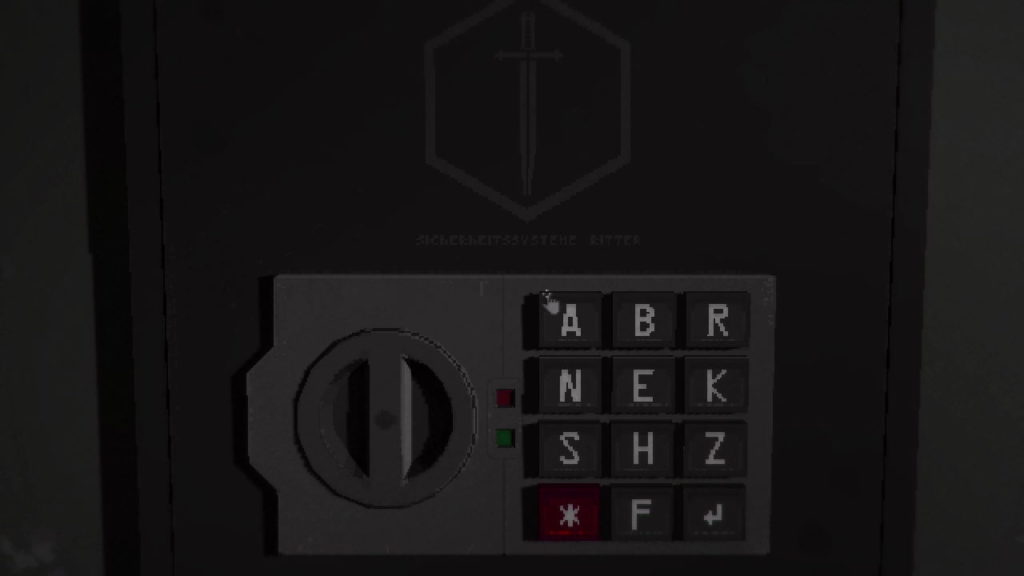
You’ll notice we have all the letters previously found, plus another letter – F. This must be the equivalent of 8.
As such to open the Sword Safe, enter the following code:
AKBFR.
The Sword Safe will open and you will be able to grab the Incinerator Room Key and the Eidetic Module which is an optional item that allows you to take pictures to help you solve puzzles. Now return to the Morgue and use the Incinerator Room Key and enter the Incinerator Room.
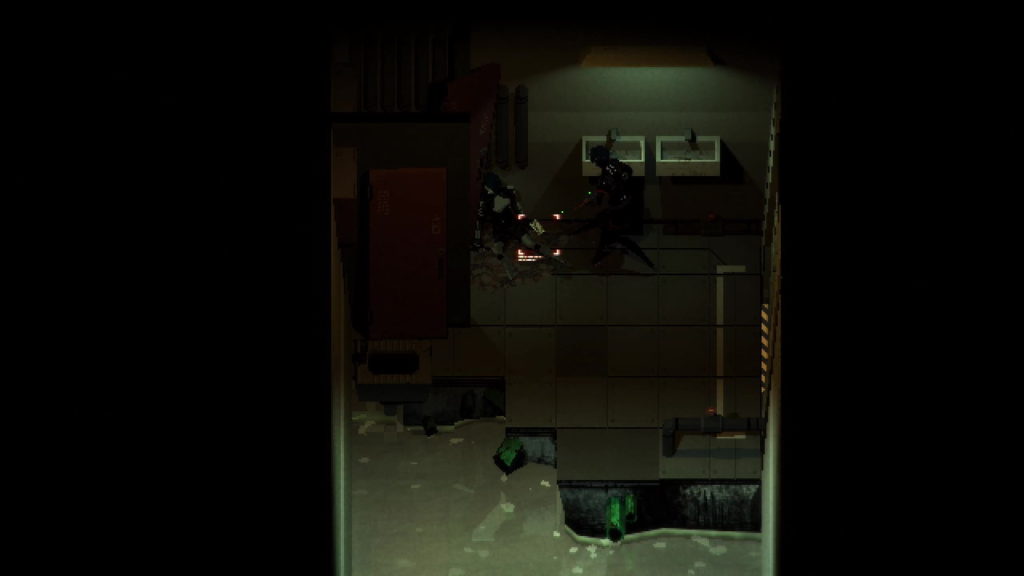
You’ll now need to interact with the Incinerator Controls on the far wall. As you do so you’ll notice you can look at the “Achtung” message below for more details on how to solve the puzzle.
Essentially you need to find the right balance of levels of CO2, Gas and O2. To understand how it works, turn each of the dials to any point, and then pull the lever to your right. Chances are you won’t be correct, but the good thing is, the machine tells you which direction you need to go next with each level.
Note the example below:
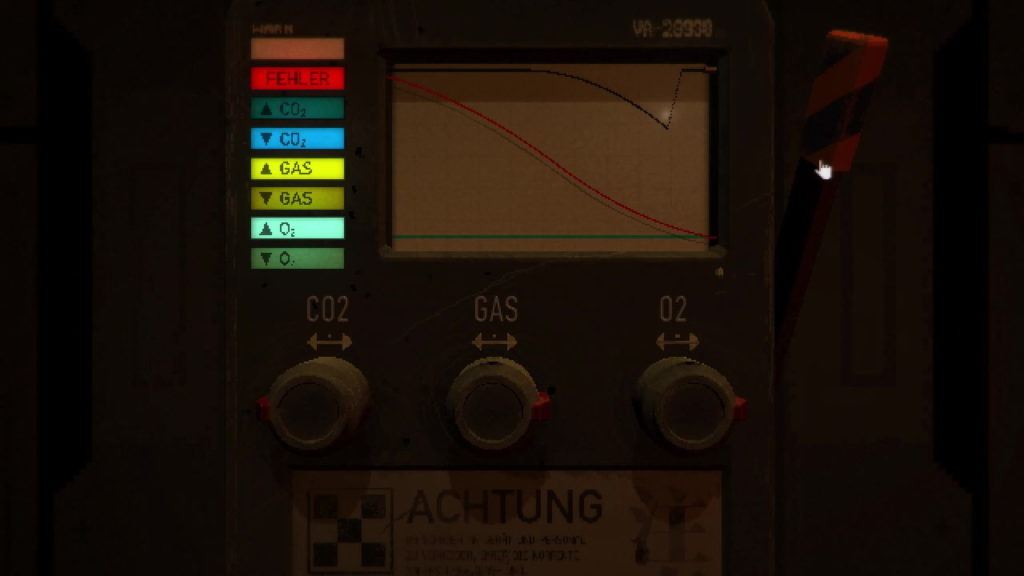
What you need to focus on is which panels on the left light up after each incorrect guess. For each gas, you should note the following.
Up arrow highlighted: Too high, needs turning anti-clockwise
Down arrow highlighted: Too low, needs turning clockwise
No arrow highlighted: At correct level
So for our image above, our CO2 was too low, and our Gas and O2 were too high. So now it’s simply a case of tweaking the dials until all the lights go out. We recommend changing each dial once or twice in the needed direction and then pulling the dial again, so you can hone in on the solution quite quickly without getting confused.
If you are struggling, then see the below image for the correct solution:
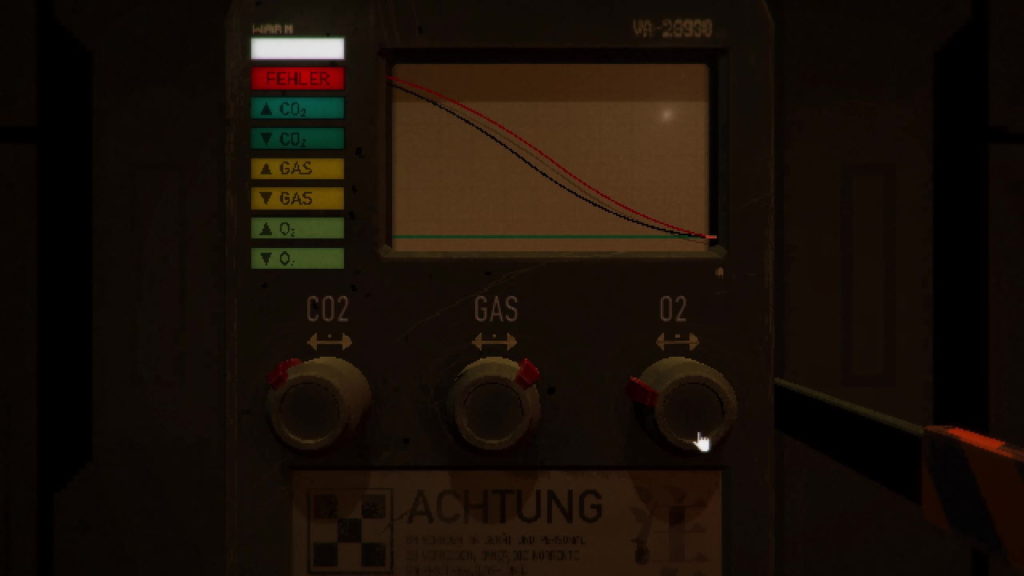
Now the Incinerator will turn off, and the door will automatically open. You should now be able to pick up the Fire Key. Return to the 5 Lock Door and use it in the “F” Lock.
Jump to Key:
Fire | Water | Gold | Air | Blank
Water Key
From the 5 Lock Room, you’re going to want to head West into the West Corridor. Then head West again into the Protektor Bathroom. Here you will find a dead Protektor holding the Pump Room Key. Luckily the Pump Room is close by. Return to the West Corridor and head south, and use the key on the lower East side to access the Pump Room.
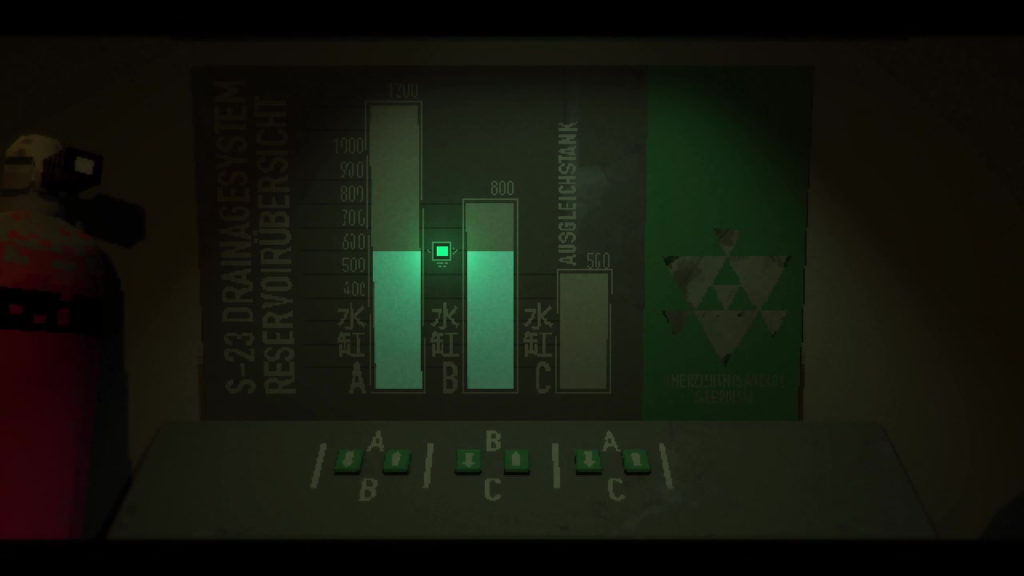
You now need to solve the Reservoir Drainage puzzle. This is one of those “pour water into different containers” puzzles. The aim of the puzzle is to get the same amount of water into both A and B at the same time.
It can be quite a convoluted puzzle, but thankfully the solution is written down in this room to help you. Read the note in the bottom-right of the room, and it will detail the puzzle. Essentially you need to:
Transfer A to B
Transfer B to C
Transfer C to A
Transfer B to C
Transfer A to B
Transfer B to C
Transfer C to A
By doing this you will have equalised A and B:
And the water will drain away from a hole in the corner of the Protektor Bathroom. Now you’ll find if you return to this room you can drop down here to the floor below. You’ll land in some shallow water, with crucially the Water Key on a table to the South of the room.
However, you can’t get back up the way you came down. Thankfully it’s not too complicated. You need to exit the Flooded Bathroom via the East door, into the Flooded Corridor. Now head South, and into the first door to your left that you see. You’ll find yourself in Pipes where there are steps to climb up. Now in the upper Pipes room, you can unlock the door to the right, and find yourself back in the West Corridor. From here, go back to the 5 Lock and use the Water Key on the “W” Lock.
Jump to Key:
Fire | Water | Gold | Air | Blank
Gold Key
To access the Gold Key, you’ll want to first head to the Sleeping Ward, which is the northwestermost door from the Flooded Corridor. Here you’ll find the Video Tape. Now you may have already stumbled upon the VCR earlier on in your travels.
If you can’t recall where it is, it is in ICU 01, which is found North of the South Corridor, in fact, it’s the first door to your North when you enter the South Corridor From the East Corridor. Now use the Video Tape on the VCR.
Something weird will happen next as the video will play, but shortly afterwards, your consciousness will be transported aboard a train. You need to move forward towards the figure seated ahead of you.

As you approach, the lights will flicker off and on, and instead, you’ll see a key when the person was sitting instead. This is Gold Key. Head over to it and interact with it to pick it up. Doing so will transport you back to ICU 01. Here it’s just a quick couple of rooms back to the 5 Lock. Use the Gold Key on the “K” lock.
Jump to Key:
Fire | Water | Gold | Air | Blank
Air Key
First, you’ll want to head over to the Flooded Office save room. On the desk to the bottom of the room is the Examination Room Key. As before you’ll likely have found the locked Examination Room door before, but in case you’re struggling it’s located on the floor above. It’s likely you’re last remaining locked door, off of the North Corridor.
When you get there, use your Examination Room Key to unlock it and enter. In here, you’ll want to head to the desk at the far end and pick up the 10mm Socket.
We can’t use this item on its own, and we’ll need to combine it with something else for it to work. So now we want to head to the Store Room, which is West of the West Corridor and in there we need to pick up the Socket Handle.
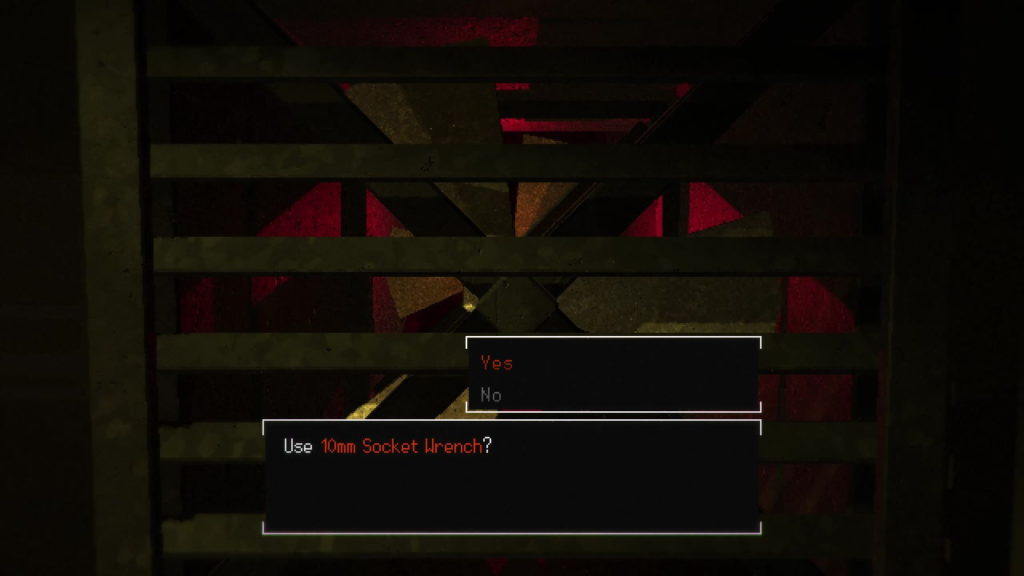
With both the Socket Handle and the 10mm Socket we need to combine them both to get the 10mm Socket Wrench. With this in hand, we now need to head back to the Sleeping Ward – where we found the VHS Tape.
From here, we need to go in the only door to the North we can open (in the northwest corner), which will lead us to the Vent Room. Once inside, move towards the Vent in the corner and interact with it. Use the 10mm Socket Wrench on the Vent to unscrew the covering. Then you should be able to grab the Air Key from inside.
Now head all the way back to the 5 Lock room and put the Air Key in the “L” lock.
Jump to Key:
Fire | Water | Gold | Air | Blank
Blank Key
The final key you’ll need for the 5 Lock puzzle in Signalis is the Blank Key. To start off this Key, you’re going to want to head to the North Corridor in B3 of the facility. Then you’re going to want to head North through the middle door into the Imaging Room. This room has an X-Ray machine in it.
Go ahead and interact with the machine, and it allows you to view five different items in two different modes – normal and X-Ray. You’re going to want to be viewing Item D in X-Ray mode. You’ll see what looks like a key card there. Rotate the card, until you can clearly see the line and dot pattern on it, and make a note of the pattern. You will need this pattern later.
![]()
Now you’ll want to head to the Flooded Store Room, which is the southeasternmost door leading off of the Flooded Corridor. Here you can pick up the Blank Key.
Now head back up to the Office which is just North of the Reception save point you will have used a few times. In the Office is a Card PC which is what you will use to replicate the Earth Key needed for the 5 Lock.
You’ll need the pattern you noted down before and the idea is, you’re going to imprint this onto the Blank Key. Interact with the Card PC and make the marks the same as the below picture, which will match the pattern you noted earlier:
![]()
Now you need to print the key. Once done, remove the Blank Key from the Card PC. Now we can head on over to the 5 Lock door, and place the Blank Key in the “E” slot. This final key will mean the lock will open and you will have solved the 5 Lock puzzle in Signalis.


