Clem Full Walkthrough | Chapter 3 – Intelligence

Intelligence is the third chapter of our walkthrough of Clem, a game by Mango Protocol. We’ll guide you through every step of your journey, and even note where you can get achievements along the way too. So read on for our full walkthrough of Clem Chapter 3 – Intelligence.
Clem Walkthrough: Chapter 3 – Intelligence
Here we are again, back in the basement with a new instruction “Bring me Intelligence”. Again, refer to our book to discover that Intelligence equates to a Spider of all things. Well, let’s get going and head up the stairs. Head towards the Main Hall, and then go outside. Walk right, beyond the shed, and through the open gate. Here you will find a set of green doors guarding some steps leading underground. Open the doors, and then head inside. On the metal shelving unit at the back of the room, you will see a pink circular case, with blue buttons on it. Interact with it to begin a puzzle.
You’ll notice as you start, that the four moon buttons in the corners are in the “up” position, and the twelve sun buttons are “down”. The key to this puzzle is to reverse this, and lower the sun buttons, but raise all the sun buttons. Pressing a button will change a button (raise or lower) those adjacent to it. The trick though is that those adjacencies flip with each button press. It alternates between cardinal adjacencies and diagonal adjacencies.
Thankfully the game will showcase which buttons will be impacted courtesy of some directional arrows. It’s difficult to walk you through the solution. It’s better to just play about with the buttons, and try and get a large portion of it in the right place (suns up, moons down), and then work in a small space to get the final buttons round the correct way.
Once you’ve completed the puzzle, the pink box will open to reveal a note to add to your notebook, concerning a charm. Also, be sure to grab the Bottle of Wine from the pink toy box. Pick up the Doll from the floor, that we will use later. Now finally, before leaving, investigate the pile of magazines near the stairs leading upwards.
It will show some pages from them discussing a wine puzzle. Be sure to use your Lens of Truth on the pages to reveal some coloured answers to the puzzle. This will get added to your notebook when completed. Now exit the room up the stairs, and actually make your way all the way back to the basement where we started. Head to the door on the right, and armed with your Runic Key you can now unlock it. The solution for the lock is:
Down 6, Up 9, Down 8, Up 7
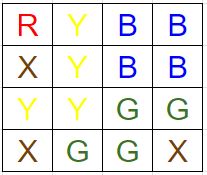
Once the door is open, head into the Wine Cellar. Here is a puzzle we can now solve, so investigate the wine rack to see how it works. You need to place all the bottles of wine in the rack, in a specific pattern. That pattern needs to abide by the puzzle rules revealed by the Lens of Truth in the wine magazine earlier. You can bring up your notebook to remind you of it. Don’t forget you will also need to place the Bottle of Wine that you picked up from the pink toy box too, to complete the puzzle. If you are struggling with the solution, see the image below:
Once you complete puzzle, the lower part of the shelf will open to reveal a Little Wooden Box. Head into your inventory and separate the Little Wooden Box to reveal the key item, the Teleport Charm.
Note: Finding the Teleport Charm will get you the “No Time To Lose” achievement. Congratulations.
The Teleport Charm does what it says, it allows you to teleport, but only between certain locations. Those locations are dictated by a rune on the ground – you may have seen a few on your adventure so far. Unfortunately, you need to initiate them from scratch now, and then all you need to do is open the map from anywhere (X on the Xbox pad) and then select a teleport rune you have activated to head there.
Exit the Wine Cellar, and then you’ll see the first teleport rune, on the floor by the barrels. Head over to it to automatically activate it. Head up the stairs, and return to the Main Hall. You’ll see another teleport run up the central staircase, so be sure to activate that, or this next step won’t work.
Head over to the right, and investigate the door-looking shape to the right, under the lamp. Use your Lens of Truth to reveal an odd shape, that looks like a capital K on its side. A look in our textbook reveals, this is the symbol for Discretion. Now head back into the Study. And it’s worth rereading the note we originally got from this room in Chapter 2. It mentions not only the Temperance symbol that we used previously, but the Discretion one that we just discovered in the Main Hall.
Head over to the book case, and use the green books to mark out the Discretion symbol. Do this by interacting with the following books:
Top Row: Far left book, far right book
Second Row: None
Third Row: None
Fourth Row: All three books
This will then cause the Discretion symbol to be marked out in a pink haze. It won’t open the door but with our Teleport Charm, we don’t need it to. Teleport to the Main Hall. You will now see that the door shape is now open, revealing a staircase downwards. Head down.
You’ll find yourself in a spooky Crypt area, and the door will shut behind us. Not something to worry about when you can teleport. Head right and pick up the Shoe from the ground, to use later. Head into the right corner, to see the Iron Maiden. This can be unlocked with your Runic Key, using the following code:
Up 1, Down 2, Up 5, Down 2
This will unlock the Iron Maiden, revealing an unsettling reality, that Clem’s dad, Martin is in the Iron Maiden, dead.
Note: Opening the Iron Maiden will get you the “Voodoo” achievement. Congratulations.
You’ll see a note drop that you can pick up and add it to your notebook. Now teleport back to the Main Hall. Head right into the Utility Room and you will see on the floor the Spider that we are after. As you approach it will scurry into the hole in the floor. Then if you head back down to the Crypt, you will see the Spider hanging from the ceiling. Again if you approach it, it will head back up, to the Utility Room. We need to find a way to trap it.
Head over to the hole in the floor in the Utility Room that the Spider escaped through. Use the Cruet on it that we’ve been carrying since Chapter 1. That will cover the hole in an oily substance. Now when you head down to the Crypt, you’ll see the oily substance is dripping down the Spider web, onto the floor. if you head under the Spider it will try and escape as normal, but can’t and slips off the web to the floor. It will now try and scurry away.
Now we need to play a game of chase with the Spider. The key is to get the other side of it, and round it so that it runs back into the oil again. This will slow it down, and then that is your chance to capture it. Head on over to the Spider and quickly use the Little Wooden Box on it to capture it. If you’re not quick enough, it will scurry away, and you’ll need to repeat making it walk through oil.
Once captured, return the Spider to the usual upstairs room to finish the chapter.
Note: Handing over the Spider will get you the “Intelligence” achievement. Congratulations.


