Sherlock Holmes The Awakened Walkthrough Chapter 1

Chapter 1 of Sherlock Holmes The Awakened, The Shadow over London, is set in Baker Street in London, and it may be a chapter you need a walkthrough for. In this chapter, we will begin our adventure in the familiar surroundings of Sherlock’s residence. Before long a seemingly simple missing person case will become more than meets the eye. As with any chapter in Sherlock Holmes The Awakened, Chapter 1 can be difficult to figure out, but here at God is a Geek, we’ve got an entire walkthrough for the game to help you through all the puzzles.
Sherlock Holmes The Awakened Walkthrough Chapter 1
Your first investigations
Once you gain control of Sherlock for the first time, you’ll need to inspect your flat. Turn around and inspect the table in the middle of the room. This will be your introduction to the Investigation mechanic. You will need to Investigate the table and find 3 items on it.
You will find:
- London Advertiser – September 28, 1882
- Book from Barnes
A cutscene will now play which brings up your first Evidence: ‘The Strand’ is missing. Yes, that’s right we’re off to solve a mystery about a missing newspaper.
There’s nothing left to do here, but to go outside. Before you’ll do you’ll have the optional task of changing Sherlock’s clothes (this can be done anytime). Do so if you wish and exit onto the street. At this point, you’ll unlock 221B Baker Street fast travel point
Wander over to the rubbish bin by your front door. And interact with it for another Investigation. You’ll want to find two things here, specifically:
- The Strand Newspaper – which will update your ‘The Strand’ is Missing Evidence
- Cactus Pine, Potentially Poisoned
The Newspaper Seller
As you leave your bin, you should hear a young boy’s voice, selling copies of The Strand on the other side of the street. Head on over to him and speak to him.
You’ll deal with Dialogue for the first time here. White options are purely optional conversation topics. Yellow options will progress the story. So whether you choose the other option first, eventually you must ask him “What happened to my newspaper”.
He’ll mention a man who had Sherlock’s newspaper. You’ll then have three yellow dialogue options. You’ll learn the man was carrying a lot of books with him. There was a loud bang whilst he was outside your house, and this man kneeling at your door. Unfortunately, the boy didn’t see which way the man went. This will get you Newsboy’s Testimony evidence.
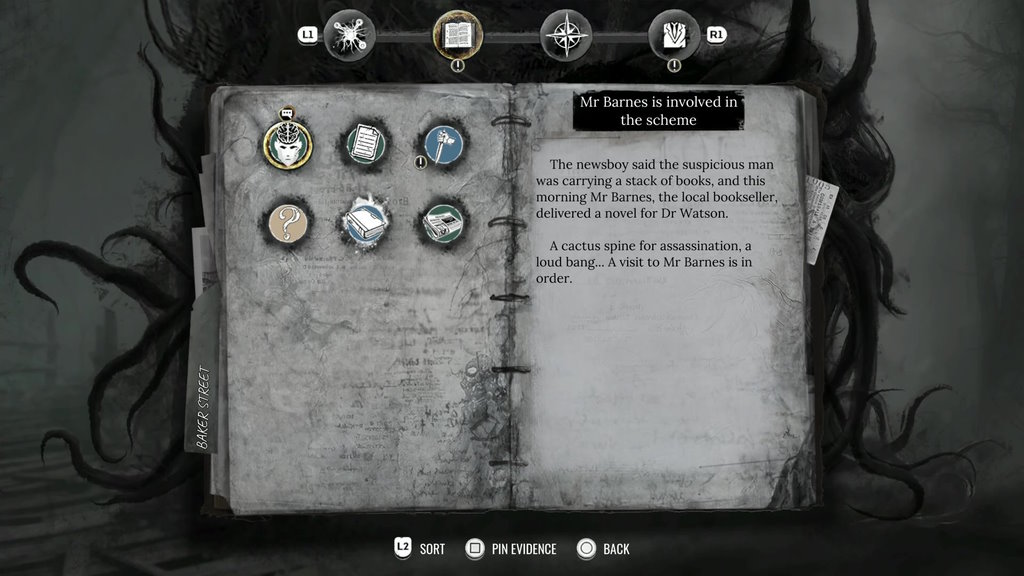
Now it is time to use the Mind Palace mechanic to put pieces of evidence together to solve certain puzzles. If you open up the menu and move to the Mind Palace section, you’ll see the question Who ruined ‘The Strand’? Click on this and you’ll see a black circle with two orbs in it – a green and a blue one. These colours represent the type of evidence we need to choose. So we need one blue piece of evidence – an Item – and one green piece of evidence – Documents and Testimonies. Think what information you have which could point to the answer of who ruined the Strand.
If you are struggling the two pieces of evidence you should highlight are Newsboy’s Testimony and Book from Barnes. This will reveal
Barnes, the local bookseller, ruined the newspaper.
This gives you the Mr Barnes is involved in the Scheme Evidence.
Sherlock Holmes The Awakened Chapter 1 – Visiting Barnes
After this revelation, we learn about Pinning Evidence. Going into your Evidence and selecting “Pin Evidence” allows it to appear on screen. THis is not only a handy reminder for you as you play, but interacting with NPCs with a piece of Evidence pinned will ask them directly about that information. The game recommends you pin the Book from Barnes and use the photo to try and find the shop.
If you head right from the Newsboy, and then take the road to the left, and follow it round the left bend, you should approach Barnes’ Bookshop on your right. A fast-travel point will be added. Enter the bookshop.
If you open your Evidence, you’ll notice the Mr Barnes is involved in the Scheme Evidence has a speech bubble icon above it. This means you can learn more by speaking to someone about this Evidence. So pin it now. Now head down the stairs and approach Mr Barnes at the counter.
You’ll get the option to perform your first Observe mechanic, which after collecting various pieces of information, allows you to form a Character Portait of a person. Once you’ve found all the information – highlighted with little yellow wisps, you are given the option of choosing whether Blackmail victim or Workaholic. Whilst it doesn’t matter which one you choose, Workaholic is the more accurate answer.
You’ll try to speak to him, and he’ll run off and lock himself in an office. You’ll be told you can now press a button that will highlight interactive areas in the environment, so try it out and interact with what you find. You’ll particularly want to Investigate Barnes’ desk to find the Exotic Plants Catalogue. Also be sure to head to the front window to find Dead Flowers on Display. When you’re done with everything, head outside.
Speak to Lily
Over the road from the Bookstore is a Florist with a lady outside. Go and interact with her to find out her name is Lily. Then search for interactive areas, specifically the arrangement of flowers to your left. Investigate it, specifically the Cactus, which has two parts to inspect denoted by small white circles. Once done, you will get the Cactus in a Cracked Pot evidence. Also investigate both roses for the Roses for Sale evidence.
Now you’ll have a chance to Observe Lily. Once you have found the details, you can choose between Ready to move on or Still grieving. Again neither is critical, but Ready to move on is the correct guess.
After the Character Portrait, you will be given the option to Provide Evidence to Lily. This allows you to go through evidence in your collection and ask her about them one by one. Once she has provided all the additional information she can, the option will automatically end. Ask her about the Dead Flowers on Display, the Cactus in a Cracked Pot, and Character Portrait: Mr Barnes.
You now have everything you need for the next Mind Palace puzzle, Why is Barnes acting so strangely?
Select Dead Flowers on display, Cactus in a cracked pot and Mrs Flemming on Barnes to deduce:
Mr Barnes is in love with Mrs Flemming
And get the Mr Barnes Loves Mrs Flemming evidence.
You can now confront Barnes with this information, and he’ll reveal himself and confess to what happened. You’ll be given a choice to help him with his love life. The kindest option is I know what to do. You’ll also eventually get The Strand – September 28, 1882 piece of evidence. You can exit the bookstore
Sherlock Holmes The Awakened Chapter 1 – Stenwick Mansion
After a short cutscene, Watson will reveal more about the case he mentioned earlier. You need to head to Stenwick Mansion, which is in the direction the road takes straight ahead as you exit Barnes bookstore. You should see some gates on your right that are open, follow the path to the two gentlemen by the front door. A cutscene will follow.
When prompted ask both lines of yellow inquiry to progress the conversation, and the police officer will leave. You’ll then be given further lines of questioning for Stenwick about the disappearance. Once they are all complete you’ll have Captain Stenwick’s Testimony.
Head around to the left of the Mansion, and follow the path around, through a doorway in the wall until you see a headless statue in front of you. Search around the back of it and you will find an Investigation point. When zoomed in, you’ll see your first Concentration Symbol. These are green symbols, requiring you to use the Concentration button to learn more. Once done, investigate the rest of the area, uncovering Chewing Tobacco Remnants and Footprints in Captain Stenwick’s Garden.
Once you’ve finished investigating the area, the Imagination mechanic will be able to be used. This mode requires you to piece together pieces of what happened at a place using your imagination. In Concentration mode you will see a number of synapses – small green spheres at the top of the screen. The number of orbs represent how many scenes of the story there are to pull together. These larger orbs are surrounded by smaller dots, indicating different interpretations of each scene. By exploring the area it is up to you to deduce which interpretation of each scene is correct. Once an interpretation for each scene is set, you can validate your answer.
Collecting Imagination information
Right now we can see when we enter Concentration mode, we only have found one scene, and one interpretation of that scene. It is best to find all scenes and interpretations before trying to Validate. So let’s go exploring to find more clues.
Progress through the garden, and head to a gate in the wall. Investigate it to find A Lock with an Unusual Key evidence. Before heading inside the shack, head down the left-hand side of it. You should see a pipe you can interact with, which reveals a rag someone used to plug the chimney. Now head inside the shack, head to your left and investigate the stove next to the window. Once you’ve found the opioid, you will unlock the second Imagination scenario.
If you look to your left, you can investigate some other items including some Clothes made of Hessian.
Now turn around, and return to the other room of the shack, and Investigate the floor. Once it has been fully investigated, another scenario is unlocked. Then investigate the area by the wall, to find the sack of grain and pick up a Small Navy Spyglass.
With this new evidence, return to Stenwick to Provide Evidence. Ask about the Spyglass, Clothes made of Hessian, A Lock with an Unusual Key, Chewing Tobacco Remnants, and Footprints in Captain Stenwick’s Garden.
We now have all scenarios for the first three scenes. We can put them in the correct scenario:
- Scene 1: Scenario 3
- Scene 2: Scenario 2
- Scene 3: Scenario 3
The final two Scenes
As you may have noticed whilst wandering in Concentration mode, setting those scenarios up, a prompt has been appearing on the right of the screen to pin a piece of evidence. If you press the prompt it will reveal the correct evidence to pin is A Lock with an Unusual Key and will pin it automatically.
Now return to the shack. With the evidence pinned, you’ll notice two areas you can Concentrate on that you couldn’t before. Investigate both of them to update your evidence and unlock the fourth scene.
You can now head outside, and you’ll see directly to your right another couple of areas to Concentrate on that weren’t available before. This reveals the Trail in Captain Stenwick’s Garden evidence. And more importantly, the final scene for our Imagination mechanic. Note the fourth scene is by the cart tracks, and the fifth scene is by the garden gate door.
Now go ahead and set the final two scenes as follows:
- Scene 4: Scenario 2
- Scene 5: Scenario 3
Now go ahead and Validate your selection, and Sherlock will recount the events of what happened to Kimihia. This reveals the Kimihia Abduction evidence. Now report back to Captain Stenwick and exhaust the yellow dialogue options. You’ll get the Abductor’s Trail evidence.
Hot on the trail
With the key from Stenwick, you can now access the area on the other side of the garden. Head through the gate, and turn left. If you Concentrate, you’ll see the cart tracks head off ahead, and then turn left.
Investigate the cart of hay to the left, for some more evidence to add to your collection. Most notably the Sailor’s Knot, Wallet with saltpetre and Calling Card.
Now we have everything we need for our final two Mind Palace puzzles for this Chapter.
Starting with What are the notable features of the abductor?, select Footprints in Captain Stenwick’s garden, Spyglass and Sailor’s Knot. This reveals:
Kimihia was kidnapped by a sailor.
This gets you the Abductor is a Sailor evidence.
Now for Where does Kimihia’s trail lead? Choose The Strand – September 28, 1882, Wallet with saltpetre, and Abductor is a Sailor. This reveals:
All evidence points to the Port of London
This gets you the Kimihia’s Trail leads to the Port of London evidence.
Now all you need to do is find a cab driver to take you to the Port of London, and the Chapter will end.
Congratulations you have completed Chapter 1 of Sherlock Holmes The Awakened.
NEXT: CHAPTER 2
CLICK HERE TO GO BACK TO OUR MAIN WALKTHROUGH PAGE


