Escape Academy It’s Not Rocket Science Walkthrough

It’s Not Rocket Science is the second escape room in the Escape Academy DLC Escape from the Past by Coin Crew Games, and here is our walkthrough to help you through every step:
Escape Academy It’s Not Rocket Science Walkthrough Details
Time to complete: 40 Minutes
Difficulty Rating: 4/5
Walkthrough
Grease the Gears
From the outset, head out of the truck and turn to your left, to see an old-school gas pump. On it you will see the following information:
Last Sale: 6 Gallons
Charge: $2.26 includes a 40c service charge.
From this information, we can do a bit of quick maths to work out that the cost of each Gallon of gas is actually 31 cents.
Now head inside the building just to the right of the pump. We need to find some money. For this head over to the right wall, and you will see some lockers. Open the second locker from the left – this is Sandy’s locker – and interact with the red purse to acquire 1 Cent Coins, 5 Cent Coins, and 10 Cent Coins.
Now turn back towards the door you came in, and just to the right of it you will see another internal door. It has a sign on it that reads:
1 Gal. Gas Please
Now we know from the calculations we did earlier, that the answer is 31 cents. There are 4 slots on the door to enter coins. Using the coins we picked up, place a 10 Cent Coin in 3 slots and then a 1 Cent coin in the last slot. This will unlock the door.
Head inside to the car on the far side. Head towards the bonnet. You’ll find a key lock there. But more importantly, you’ll also get a good look at the license plate, which reads:
20L35R5L
These are the directions for the safe lock on the car hood. You need to turn the car key left until it reaches 20, then right until it reaches 35, then left until it reaches 5. Doing so will unlock the hood.
Head over to the workbench to pick up the Thermocodex Spark Plugs. Return to the engine and use them on it. Now you need to arrange to spark plugs on the engine to avoid overheating it. You can refer to poster on the wall to see which spark plugs have the best heat resistance, and put those spark plugs against the nodes with the largest scorch marks around them. If you’re still struggling the correct order of spark plugs from top to bottom is:
Green, Dark Blue, Light Blue, Red, Yellow
Now, with that fixed, turn to your left and interact with the chain to release the shutters. Then interact with the car door to head inside and start the engine to move the car outside.
With the car moved, you can head into the grease pit underneath and pick up the Engine Grease. Now head outside to the rocket. Climb the ladder by the rocket to reach the panel high up where the gears are grinding together. Use the Engine Grease to get the gears moving again.
Measure TWICE
Head back to the main workshop and to the lockers again. This time, open the one on the far right – Charlie’s locker. Pick up Charlie’s Favourite Record. We’ll come back later to unlock the backpack. Look to your left and head over to the corner of the room where there are loads of music posters on the wall and a record player. Use Charlie’s Favourite Record on the Record Player. It won’t play though because it has no power.
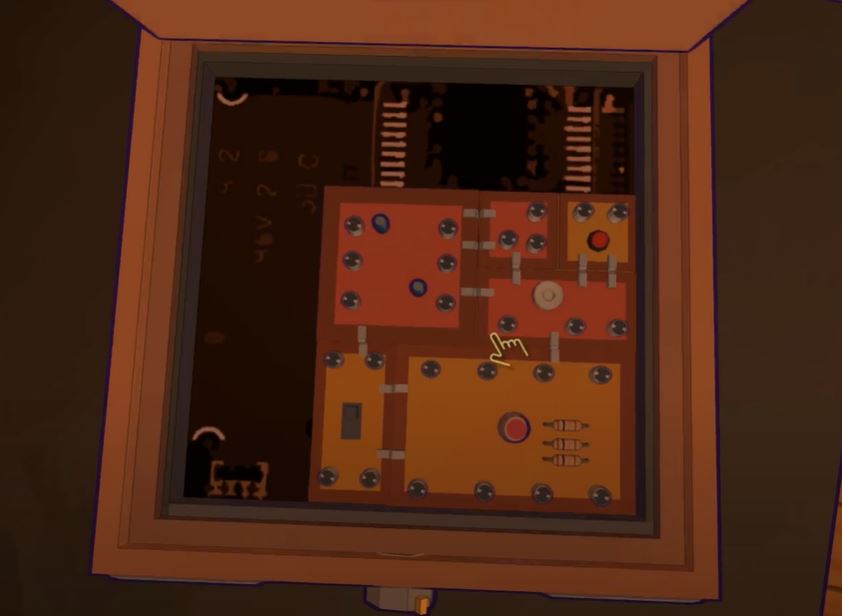
Interact with the button on the front of the Record Player to open it up and see the electric boards inside. We need to reorganise them so that they fit together properly. The key to this is to notice the pins on the edge of each piece. They need to interlock with another piece to create a complete rectangle with no spare pins. You’ll need to move the pieces around a fair bit. See the final solution below so you know what you’re aiming for:
Once done, you can now Interact with the Record to play it and hear the song. The song that plays is all about a glass of water. Now look at the posters on the wall. You will see on the top left of the back wall a poster referring to a “Tall glass of water” by a band called the SOLVE. This is the clue you need.
Head back to Charlie’s locker and interact with the backpack and enter the code SOLVE into the lock combination. Then grab the Measuring Tape and the Cryptic Schematic from the backpack. Pin the Cryptic Schematic.
Now turn completely around and head to the far side of the workshop. You’ll see a noticeboard in the corner with the following message on it:
Metal shop password?
Measure TWICE!
The clue here is the word “TWICE” Refer to your pinned Cryptic Schematic and you’ll see that each length of the peculiar shape has a letter attached to it. And then there is the same shape on the blackboard. Identify each length representing the letters T, W, I, C and E. The go to blackboard shape and use your Tape Measure to measure how long each length is. Each length measurement is a number for the code to the metal shop door.
You’ll find the following measurements:
- T = 7
- W = 6
- I = 2
- C = 8
- E = 3
Putting this code into the door lock to the left of the blackboard will unlock the Metal Shop room.
Weld the Panel
Head into the Metal Shop room and pick up the Welding Kit on the desk in front of you. Then head back outside and leave the Workshop.
Approach the rocket, and you will see on the front of it that a panel is falling off. Use the Welding Kit to move it into place. Then trace around the edge of the panel with the Welding Kit to weld the panel to the rocket. Once this is done you’ll hear the familiar Escape Academy tune.
Finish the Fin
Now head back into the Workshop and turn immediately to your right. In the corner of the room, under the window is the Unfinished Fin to pick up. Turn around and look at the benches of the workshop. You’re going to want to head to the furthest back bench, ad to the left hand side – near the door to the Metal Work shop. Here you will find the Safety Goggles that you can interact with.
This will zoom in and reveal arrows in a specific order:
↑ ↓ ↑ ↓ ↑ ↓ ↓
However, this is not the code we need, because we need think a bit cleverer. Because actually if you wear the goggles your perspective would change, and the code would be reversed, meaning the true code is this:
↓ ↓ ↑ ↓ ↑ ↓ ↑
With this code noted down, head back over towards where you picked up the Unfinished Fin. You’ll notice the workbench nearest there has a cutting machine on it. On the end of the workbench farthest from where you found the fin, you’ll see an area you can interact with. It reads SAFETY FIRST with a set of levers you can put in either the up or down position. Use the code we found (↓ ↓ ↑ ↓ ↑ ↓ ↑ ) and arrange the levers in that order, and then flip the switch to the left.
This will turn on the blade. Use your Unfinished Fin on the blade and then pick it up to receive the Rocket Fin. Now head outside back to the rocket. Look around the back of the rocket to see a section with a missing fin. Use the Rocket Fin there to attach it.
Monstrong, we have a Problem
Now with the Gears greased, the panel welded on and the rocket fin replaced, we should be good to launch. Head back to the truck where Monstrong is, and press the big red launch button. That’s everything done right? Well no, disaster strikes, and the platform holding the rocket collapses. Now the rocket is aimed at the Headmaster’s Tower, and we need to fix it before it launches! And Monstrong is zapped, meaning it’s up to us!
Tow the Rocket
The one convenient thing that has happened as a result of the platform collapse, is the ladder has landed against the workshop. This now provides you with the means to climb up and reach the office above. Head inside. You’re looking for various different keys here.
Head to the workbench on the left to pick up the Key J and the Key Blanks. Then look to your right, and see the main office desk. From there pick up the Key O. Then turn right again, to see an anvil at the side of the room with Key E on it.
Before you leave look to the far left of the room to see a blackboard with a picture of a car on it with the phrase:
“Faithfully sealed by and AVERAGE JOE lock”
This is our clue for later.
Armed with the keys, we need to head back to the Metal Shop room.
To the right of where you picked up the Welding Kit is a Key Measuring Station. If you use each of your three Keys (Key J, Key O and Key E) on it, you will find out their different pin layouts. For reference each key comes out as follows:
- Key J: 35332
- Key O: 24235
- Key E: 13435
Now our clue from earlier said that the key to the car was an “Average JOE” lock. So what we need to do is take the average of each number for each pin, to get our new key arrangement:
- Pin 1 (Average of 3, 2, 1) = 2
- Pin 2 (Average of 5, 4, 3) = 4
- Pin 3 (Average of 3, 2, 4) = 3
- Pin 4 (Average of 3, 3, 3) = 3
- Pin 5 (Average of 2, 5, 5) = 4
So the layout for our Average JOE key needs to be 24334.
Now turn to your right and look at the Key Cutting Machine. Place one of you Key Blanks in it. And then cut the key from left to right using the 24334 code. Then pick up the Custom Key and head back outside to the car. Use the Custom Key on the back of the car to unlock it and grab the Tow Hook.
Use the Tow Hook on the collapsed platform and then head into the car and turn on the ignition. This will correct the platform and allow the rocket to fire vertically as intended.
Congratulations you have completed the It’s Not Rocket Science escape room in Escape Academy: Escape from the Past.


