Escape Academy Old Rivals Walkthrough

Old Rivals is the first escape room in the Escape Academy DLC Escape from the Past by Coin Crew Games, and here is our walkthrough to help you through every step:
Escape Academy Old Rivals Walkthrough Details
Time to complete: 35 Minutes
Difficulty Rating: 3/5
Walkthrough
Fire the Cannon
You’ll want to move quickly during this escape room as you’re up against Eel. The first thing you’ll want to do is open the boxes ahead to your left. Each one will reveal an Oversized Card. Once you have picked up all four of them from the boxes, turn around and look at the four boards to your right. Each one has a saying on it, which for now you can ignore. The thing you need to be interested in is the card suit symbol on each board. Each one will have a different symbol and the four Oversized Cards will each have a suit too. Hang the matching Card on each board. This means from left to right you should hang:
Jack of Hearts, Queen of Spades, King of Diamonds, Ace of Clubs
The cards will block out a lot of the letters from the boards, but the holes in the cards will reveal some. Put them all together to reveal a secret message:
IGNORE THE ODDS
This is a clue for the Cannon combination. It wants you to ignore all of the odd numbers in the combination, and only use the even number options. Head over to the cannon and put in the only available even numbers. This gives you the code:
2,8,4,8
When selected, the Cannon will fire, and a bridge ahead will be revealed.
Dress the Mascots
Next up you’ll see some shelves with lots of items in them, some boards to your right, and some mannequins behind everything on the far side. What you need to do is dress the mannequins in the correct colour shirt, mascot head, and sports ball, and then the way will open.
To do this, refer to your boards on the right.
Note: Eel can spin the boards around so he can read them, so be quick and memorise them as best you can, and Interact with them again to spin them back your way.
The boards read:
Sarah plays for the Red Herrings, but she does not play volleyball.
The soccer team’s mascot is a tiger, but they do not wear yellow.
The team that wears green plays basketball, but their mascot is not a bear.
George plays for the volleyball team. Magnolia plays for the soccer team.
With all this information we can deduce who plays for what team.
Note: You won’t be able to pick up every item right away as your inventory isn’t big enough, so just grab what you can, and then go back once you have space.
Head over to mannequins with a full inventory and begin appropriately dressing them as follows:
- George: Yellow Jersey, Bear Mask, Volleyball
- Sarah: Red Jersey, Herring Mask, Baseball
- Esteban: Green Jersey, Eagle Mask, Basketball
- Magnolia: Blue Jersey, Tiger Mask, Soccer ball
Keep going until all mannequins are complete, and then head out of the exit and up the ladder.
Best the Chess
At the top of the ladder, you will be confronted by a large chess board and some chess pieces. On the wall is a diagram of each chess piece and its movements in the game. Your command is written on the far wall:
Place every piece so none are captured.
So you need to place each of the chess pieces on the board in such a combination so that none of them are taking each other. This can be quite complicated. If you are struggling with where to put the pieces, please refer to the diagram below.
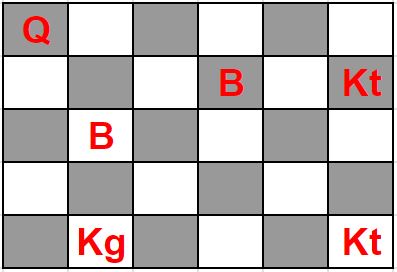
Note: In the above diagram, “Kg” stands for King, and “Kt” stands for Knight.
Once complete, another door with a ladder will open. But before you leave, notice the strange door to your right. There are two words on the side spelling out:
HO?ATIO and WINSO?
This is clearly Horatio Windsor – the Headmaster, but with the two letter “R”s missing. We should remember that. Now head on up the ladder you unlocked.
Get Your Gears Turning
Once up the ladder, you’ll want to head over to the large gears on the far wall, as they contain two puzzles we’ll need to solve. Each one will yield a die. You free to die by rotating the puzzle either clockwise or counterclockwise, and then the die will always follow gravity. Use this to force to the die to the exit. For the first puzzle you will need to rotate:
- Counterclockwise: 3 times
- Clockwise: 7 times
- Counterclockwise: 2 times
Pick up the Six Sided Die and head to the next puzzle to your right. This is the same puzzle, but harder to navigate as there are boxes that also move with the rotation. Below is a solution:
- Counterclockwise: 4 times
- Clockwise: 5 times
- Counterclockwise: 1 time
- Clockwise: 2 times
- Counterclockwise: 1 time
- Clockwise: 2 times
- Counterclockwise:
- Counterclockwise: 2 times
- Clockwise: 2 times
- Counterclockwise: 1 time
Now grab yourself the second Six Sided Die and turn around and head to the table in the middle. From here you’ll want to Use the Dice and interact with them until you roll a one on each die. Once done, head over to the now-opened door.
Solve the Double Sided Safe
Head up the ramp and towards the safe with your prize inside. Now we just need to open it. Like in the base game, you need to open all the surrounding cupboards to get what you need to open the safe.
Your first port of call should be the square directly above the safe, with five compasses on it. Notice the picture of a star in the corner. What you need to do is rotate the compasses until they form a star shape together. Once you have done so you will open the square, and can grab the E Key from inside.
You’ll also notice a message that you think reads “HELLO” inside. But look more closely and it actually reveals a number code written upside down. Flip the characters in your head upside down and it will reveal from top to bottom the code:
07734
Now head over to the square to the left of the safe, with a five-digit code lock on it. Enter your newly found number code from top to bottom. This should open it. Inside pick up the A Key and note the shapes on the back wall. They are:
Black Square, White Hexagon, Black Triangle, White Square.
We will use this to open the next square. Head to the bottom-right square from the safe – and you’ll notice it has two buttons on it, a white and black one. The correct inputs for opening this square relate back to the clue we just found. We need to convert the shapes into button presses, and for that we count their sides.
- Square: 4 sides
- Hexagon: 6 sides
- Triangle: 3 sides
This then converts into the following code to input
- Black: Four presses
- White: Six presses
- Black: Three presses
- White: Four presses
Entering this into the buttons will open the square. Inside you can grab the D Key and the clue from top to bottom:
S, NE, W, N
Head to the square directly above and simply click on the corresponding compass directions in the order revealed to open that square. It will open and you can grab the R Key from inside. You’ll also notice a picture of a house. It shows the following lights on in the house:
- Top Floor: Left and Right
- Middle Floor: Centre and Right
- Ground Floor: Right only
Make a note of this and proceed to the next square. This time head for the top-left square, with a load of light switches. Turn on the lights to match the pattern from the house you just noted down. Lights are deemed “on” when they have white light appearing on them. Then with the lights correct, ring the doorbell in the bottom centre to open the square. Inside you can pick up the S Key and a Color Graphic which we will pin immediately.
Now head to the top-right square, and using the Color Graphic deduce the correct order of the coloured squares. The Color Graphic is basically asking you to either add or remove a colour from another, so think mixing colours, or doing so in reverse. The answers are below:
Orange – Yellow = Red
Green – Blue = Yellow
Red + Red = Red
Blue + Yellow = Green
When the square unlocks, pick up the T Keyb and Magnet. We only have one final square to open now, so head on over to the bottom-right square. Use the Magnet grid to guide the ball to the exit. Now grab the H Key inside and head to the safe itself.
Use all your keys on the safe to spell out the word HARDEST to unlock the safe and grab your trophy.
Save Horatio
Something is wrong, we now need to save Horatio. The first thing to recall is the two “R” locks we saw earlier down by the chess board. For those, we will need two R Keys. The problem is we only found one. Inspect the Safe and then take the R Key you placed in it. Then look through the open side to see Eel. He is holding the other R Key so take it from him, Now return to the Chess area.
Use both R Keys on the locks to unlock it and enter. Head to your right, and you will see various Scorecards on the ground to pick up. Pick up all 8 scorecards on the ground and then retrace your steps to the Green noticeboard. It has the following puzzles:
“Red” + 7 = “Green”
“Pink” – 1 = “Blue”
Use the Scorecards you had to make the equations correct.
- Red: 1
- Green: 8
- Pink: 5
- Blue: 4
This also then gives you the code for the lever behind you, enter the right numbers against the colour to release the lever. Now proceed to the other noticeboard, which has this puzzle:
“Orange” – 5 = “Black”
“Purple” + 3 = “Yellow”
Use the remaining Scorecards you had to make the equations correct.
- Orange: 7
- Black: 2
- Purple: 3
- Yellow: 6
This also then gives you the code for the lever behind you, enter the right numbers against the colour to release the lever. Now both sides of the drawbridge have been lowered you can cross, climb the ladder and rescue Horatio.
Congratulations you have completed the Old Rivals escape Room in Escape Academy: Escape from the Past.


