Escape Academy No More Mister Heist Guy Walkthrough

No More Mister Heist Guy is the third escape room in the Escape Academy DLC Escape from the Past by Coin Crew Games, and here is our walkthrough to help you through every step:
Escape Academy No More Mister Heist Guy Walkthrough Details
Time to complete: 40 Minutes
Difficulty Rating: 4/5
Walkthrough
Take Stock of the Market
Once you get control, you’ll be in a large room, with plenty of desks around. Look immediately to your left, and from the first desk you should find the Financial Statement. You could pin this now, as we will be using it shortly. Now, look around the desks to find a total of four Projector Slides. One can be found in the recreational area at the back. Once you’ve collected all four, head to the Projector at the far end of the room, and put all four Projector Slides into it.
The next step is to look at your pinned Financial Statement, and you will notice it has a few gaps in it. You need to use the different projections to fill in the gaps. Each Projector Slide shows the price of a particular stock, and the Financial Statement lists out stock, amount of stock bought, total price, and month of purchase. Between the two sources of information we should be able to fill in the gaps.
If you’re struggling the gaps from top to bottom are:
- Stock: CLU
- Money Invested: $40
- Quantity: 4
- Purchase Date: AUG
- Quantity: 5
Armed with this information head on over to the left wall, with the large number of drawers. In the middle you should find the Jeberson drawer where you can enter in this information. Do so and the drawer will open. Inside you can grab the Lesson Plan. We’ll use this in a little while
Game the System
Now turn around and head to the back of the room to the recreational area. Your first port of call should be the bright blue board game on the table. It looks a little bit like Snakes and Ladders, but with a stock market twist. To the right of it is a locked black box. On it you will see three different orange-red patterns, and then a four code number lock.
The patterns can be found in the stock market arrows on the game board. So take a note of them now to avoid toing and froing. For simplicity we will name the patterns from top to bottom: Hound’s-tooth, Gingham and Checkerboard.
Now head over to the game board and try to find those orange arrow patterns on the game board. You’ll need to note which numbers they go from and to on the board. You should find the following:
- Hound’s-tooth: 56 to 53
- Gingham: 64 to 60
- Checkerboard: 49 to 11
Now the trick here is not to worry about the number squares themselves, but the difference between where they start and finish, i.e. how many places on the board you would lose if you landed on the top of the arrow. This translates to:
- Hound’s-tooth: 3 (56-53)
- Gingham: 4 (64-60)
- Checkerboard: 38 (49-11)
These differences translate to the code 3438 which is the code for the black box, entering it from top to bottom. Enter the code to open the box. Inside is another board game that you can interact with. Inside the game box is another clue that reads:
Guy says:
A-B-C
A-D-B-C
We will use this clue combined Lesson Plan we found earlier. Pin the Lesson Plan for reference and remember the code ABCADBC.
You’ll see from the pinned Lesson Plan that the following is actually true:
- A = UP
- B = DOWN
- C = RIGHT
- D = LEFT
So now if we convert our code of ABCADBC into directions, we get the following:
UP, DOWN, RIGHT, UP LEFT, DOWN, RIGHT
Leave the recreational area and walk all the way down to far side of the room, where the projection is on the wall, and look to your right. You will see a small door with the words “GUYS ONLY” on it. There are also four directional buttons on it. Input our newly deduced code into the door, and it will open, revealing the path forward.
Unlock the Rope
Enter the newly-opened door, and then follow the walkway around to the left, until you reach a set of double doors you can open. Head inside this new room. Head to the far side to see a desk. On the desk is a piggy bank which can break. Do so to grab the Spare Change.
Turn around and look for a machine just to the left of the door you can in by. It is a sort of pinball machine and you need to use the Spare Change on it to play. You shoot balls up the machine, and they land in the area you select hen you’re pulling back the rod. However as the ball descends the machine, if it comes across a pivoting platform, the platform will always pivot into the other direction from where it was facing, and this will alter the direction the ball falls.
The idea is to use this knowledge to choose where to fire the balls so that you manage to land a ball in each of the ten slots on the machine. The quickest way to do this is the follow the solution below and do it in your first 10 attempts.
5, 5, 4, 4, 3, 3, 2, 2, 1, 1
Now all of the lights will be lit, and a coloured pattern will be revealed at the top of the machine. We will need this pattern. The easiest way to note this down is to count the number of each colour that are on the right-hand side of the “gap”. For each colour this is:
- Red: 1
- Yellow: 3
- Green: 4
- Blue: 2
Armed with this code, we need to turn around and head over to the large glass display case. You’ll know the one because it has an abacus with the same colours at the front. Interact with that abacus, and move the coloured beads to the right, for as many as needs to be to match the above code. Doing so will unlock the case. You can now grab the Grappling Hook from inside.
Look Like an Accountant
We now need to to a bit of backtracking, because there’s another place where we can use our Spare Change. Make your way all the way back to recreational area, and look on the right wall. You should see a visor dispenser machine, that requires money. In the slot on the left, use your Spare Change and then pick up the Green Visor.
Piking up the Visor will automatically put it on, and now you can see things you couldn’t see before. You’ll see a spillage of a paint-like substance on the floor of the main room, and footsteps leading away from it. They lead to a drawer, go ahead an interact with it. Now follow the footsteps and interact with the drawers in the order the footsteps take you. When you press the final one, it will open, and inside you can grab The Escapist Times newspaper.
Pin the newspaper, and follow the footprints all the way back into the room where you found the Grappling Hook. You’ll find that they lead to the desk, and a statuette that you can interact with to reveal a secret button that when pressed reveals a secret hole in the floor. However the hatch door is to heavy to lift with your bare hands.
Turn to your right, and look at the area to the right of the glass case where you found the Grappling Hook, you should a square with tiles and letters on them. (Without the Green Visor these letters are invisible). Use the pinned newspaper to see the crossword clues, and then the grid infront of you is the crossword you need to fill out. Swap letters around until you have all the answers filled out.
The answers to the grid is below:
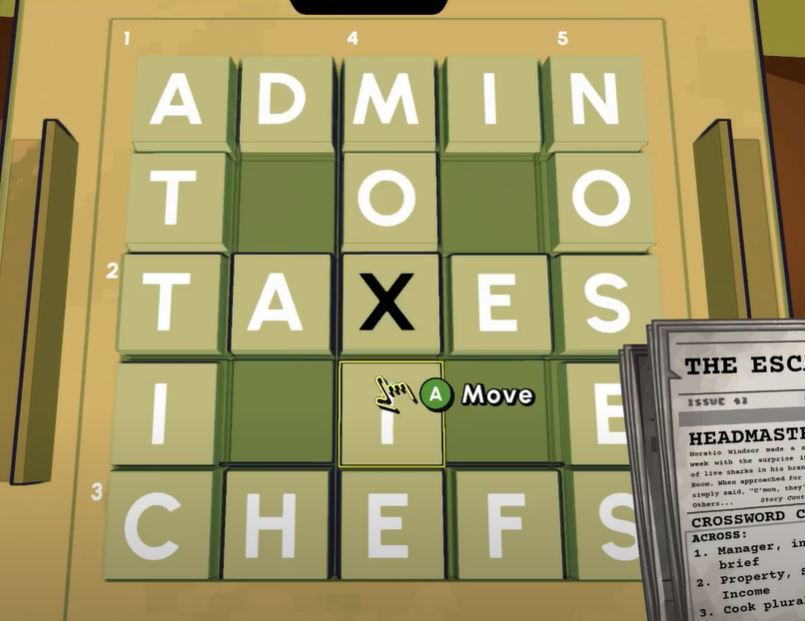
This will unlock the board, and inside is a Crowbar which you should pick up. Return to the hatch, and use the Crowbar on the hatch.
Descend into the Sewers
To Descend into the sewers, you’ll firstly need to attach the Grappling Hook to the pole, and then you can go down.
However, there will be water blocking your way. There is a system of switches that you can switch to an open or closed position. Open positions means the water will flow through it, and closed means it can’t. Using this knowledge you want to block water from flowing out of the sewer vents because then they will keep filling up the vertical sewer. Successfully blocking off all the vents will cause the water to lower a level and you will descent.
There are three parts to this puzzle, but all are the same and fairly simple to deduce. Just keep an eye on where the pipes connect to and make sure any leading to sewer vents are shut off. Once done correctly, the water will descend all the way, allowing you to reach the bottom. Keep descending the rope, until you reach the ground.
Once on the ground, you will notice eight stone panels dotted around the walls of the sewer, each with a tally number next to them. Each stone panel has a single black line marking on it. You will need to know all of these black markings in order to proceed, so explore and note them all down. They are:
- Left, lower
- Right, lower
- Bottom, left-side
- Left, upper
- Bottom, right-side
- Right, upper
- Top, left-side
- Top, right-side
With all this collated, you need to head for the ladder you can see. At the top of the ladder is a panel obstructing you. You need to press each of the eight pins in order. Press the pins in the order noted above, and it will open and you will find yourself in the vault lobby.
Unlock the Vault
The first thing you’ll need to do is get to the vault itself. Look to your left as you exit, and you will see a central area with Red, Blue and Purple lights. In front of you is a console. You can rotate any of the three discs and the black and white background, and doing so changes the coloured spotlights in the central area, which is your path to the vault.
You have to find a combination that works that allows you to pass through to the vault whilst not touching a spotlight. There are a few solutions, but one that works is in the image below:
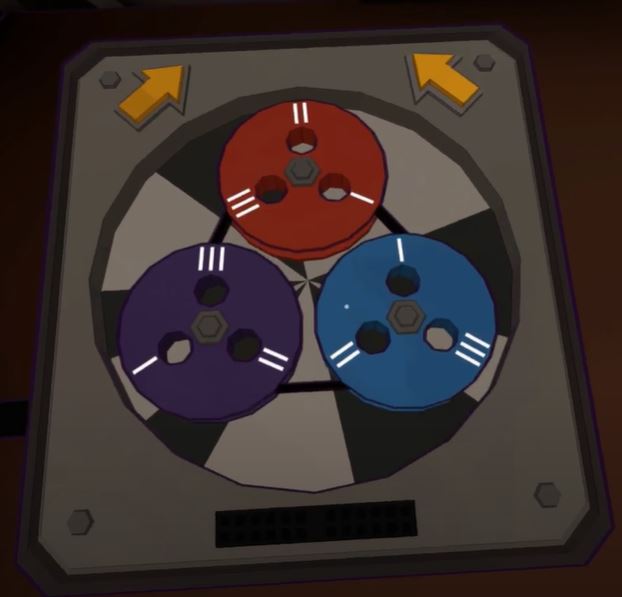
Match your coloured discs and background to that and you should be able to pass through to the vault.
The vault itself is your next puzzle. The idea being that you need to align the outer poles of the vault so that no red parts are visible. The way to do this is twofold. Firstly you can spin the small grey wheel just to the bottom right of the central wheel. This rotates a dark grey bar behind the central wheel that changes the two bars you can interact with. Then you can interact with the large central wheel to move those two bars in or out.
Keep working your way through the pairs of bars, removing the reds. Sometimes you may need to go back the other bars, as correcting some bars, create problems for others, but if you work methodically, you should have no trouble removing all the red bars and opening the vault itself.
Now head inside and pick up the Deed to Escape Academy. Well done! Now turn around and head out, and walk towards the open elevator. Press the elevator button to escape…
Escape the Flood
Did you think it would be that easy? Cracks have appeared and now the vault lobby is flooding and you need to find a different way to escape. In front of the elevator, is a small plinth with a golden structure of hands on it. You need to turn the different hands into specific directions. The message on the plinth reads:
May all you touch turn to gold
This is your clue. You may not have noticed before but dotted around the vault lobby are four piles of gold bars. In fact one is a single gold bar, there’s a pile of two, a pile of three and a pile of four. You’ll also notice that each of the four golden hands that can be rotated is pointing a particular number of fingers : 1, 2, 3 or 4.
So we have to point the one finger hand at the single gold bar, the two finger hand at the two gold bars and so on. Locate all the gold bar piles, and then rotate each hand until it is pointing in that direction. When each hand is in the correct position, the centre will open up to reveal the Golden Screwdriver.
Now head to the far right corner of the room. And you should see an axe mounted on the wall. Use the Golden Screwdriver on it to unscrew its clasps and get the Diamond Axe. Now head around to the other side of the room, and you will see a switch with the message above it that reads:
In case of emergency: break glass
Use the Diamond Axe on the glass to shatter it, and then interact with the switch to pull it. This will reveal a ladder behind you. Climb it to escape properly this time.
Congratulations you have completed the No More Mister Heist Guy escape room in Escape Academy: Escape from the Past.


