Escape Academy Into the Capture Dimension Walkthrough

Into the Capture Dimension is the fifth and final escape room in the Escape Academy DLC Escape from Anti-Escape Island by Coin Crew Games, and here is our walkthrough to help you through every step:
Escape Academy Into the Capture Dimension Details
Time to complete: ??? Minutes
Difficulty Rating: 5/5
Walkthrough
Welcome to the Laser Zone
You’ll start the level with Jeb in front of you, with four doors to enter. Look to your right, for a door with lasers all around it and enter. Once inside, turn around and head to the laser machine that you see. You should see a panel with the colours
Green, Blue, Yellow
On it. You need to enter the right code to access it. Look around the room a bit and you should notice some floating cubes with numbers on them. The cube numbers are as follows:
Green: 2
Blue: 6
Yellow: 4
However because the laser is cutting them in half, we actually need to divide all those numbers by 2 to get the code. As such the code for the laser machine is:
1,3,2
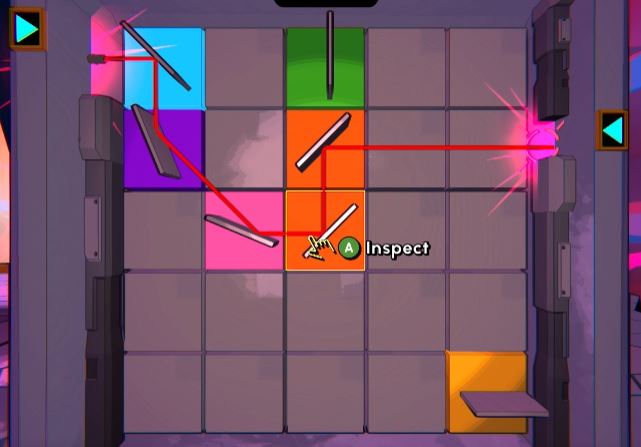
Once open, you will see a grid with a lot of reflective mirrors in it. Your task is to place the mirrors in the correct places on the grid so that the laser gets reflected to the correct output place. In this instance, on the right-hand side, the second square down.
You can play around with the mirrors to figure it out, but if you are struggling, refer to the solution below:
Now head over to the other side of the laser machine, and you will see another panel with some different colours on it. This time the colours are
Yellow, Blue, Red
A quick look around the room and you’ll spot that the red cube has the number 7 on it. As such, the code for this panel is:
2, 3, 7
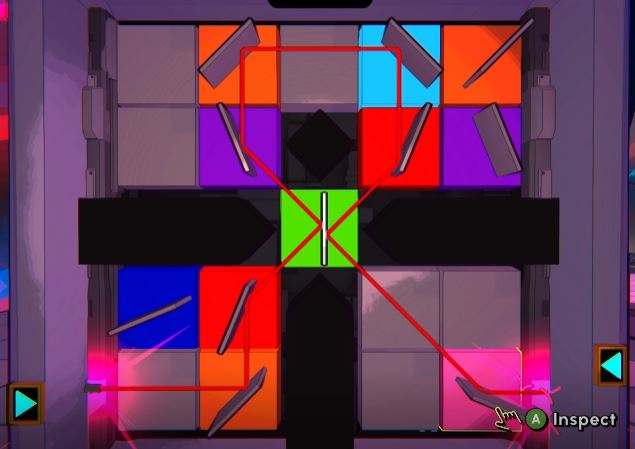
Again you’ll be presented with a laser puzzle with mirrors. This one is a bit more complicated and requires you to use a lot of mirrors and most of the grid. If you’re struggling, check out the image below for the solution:
Now, turn right, and head around the outside of the level, avoiding the lasers. You should now be able to reach the console that Jeb is attached to. Interact with it.
Move the targets to align with the lasers on each side, and Jeb will be freed.
Fulfill Your Destiny
Once back in the central area, choose another door, this time head to the door opposite, with purple tanks on either side of the door. Once you’re in this new area, you’re going to want to look for three containers with a flask on them. The first is directly in front of you in the far corner, over some pipers. Examine it for some Science Juice. Then turn around to your left and head up the ladder you see. Turn right and behind another ladder you’ll see the next container with some more Science Juice in it. Finally, head down the ladder, and look to your right into the corner with the big cylinders in them and you should see the final container of Science Juice.
You’ll now want to turn around and head up the other ladder at ground level you haven’t been up yet. At the top you should see a small cylinder. Interact with it and pour all of your three Science Juices into it. This will cause the balls in it to rise, and form the code:
2, 6, 4, 7
Head to the padlock just next to cylinder and put in this code to unlock it and allow you to turn the large crank wheel.
Solve the Think Tanks
Now head over to the large cylinder machine that is now full of liquid. Using the various crank wheels here, you can transport liquid from one cylinder to the other. You will keep transferring liquid until either cylinder is empty or full. And what you want to do is get all the Pink liquid into the far right cylinder with the duck in it.
This can be done with trial and error but if you want a quick solution, do the following:
Fill the Left cylinder with the Right cylinder
Fill the Centre cylinder with the Left cylinder
Fill the Left cylinder with the Right cylinder
Fill the Right cylinder with the Centre cylinder
This will cause the duck to rise out of the cylinder. Interact with it to obtain the Duckling Key. Now head back up the ladder to where you found the second Science Juice, and head up the second ladder.
Once up there, use the Duckling Key on the padlock and interact with the Juice Release Valve.
Mind the Mines
Once again you’ll be teleported back to the central area, and this time enter the door that is covered in bombs. Your first port of call will be to go into the central room and you’ll notice a panel with red and white dots, with letters in the middle. Each letter is essentially coded as the four red or white dots surrounding them. Now exit and look to your right and you’ll see a screen of flashing red and white dot patterns. You’ll need to use the central panel to decipher these dots into letters.
A quick bit of back and forth and you should work out that the password is:
BLAST
Which is rather fitting for what comes next. Head on over to the locked door and enter the following code into it:
[abc], [jkl], [abc], [stu], [stu]
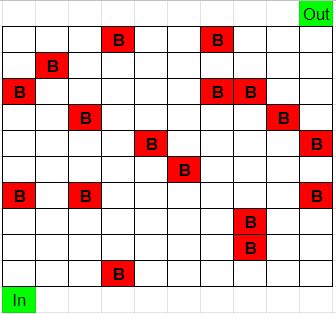
Head on down the ladder to a large grid area. This is essentially a large Minesweeper grid, and your task is to get to the other side without stepping on a square that contains a bomb. If you’re unsure of how the notation for Minesweeper works, then turn around and look at the poster on the wall that explains what the numbers on the floor tiles mean.
Now use those to avoid the bomb squares and make it to the other side. If you’re struggling, check out the image below to see where the bombs are. Simply avoid those and choose a safe route to the other side:
Once on the other side, head down the ladder , and turn around. You’re going to want to head forward and right until you’re under where Jeb was standing. Interact with this bomb – it should be red compared to the others.
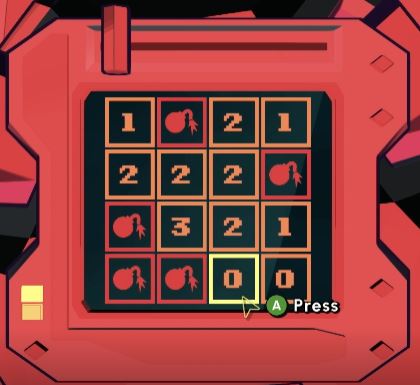
Now you need to fill in the minesweeper numbers yourself following the same rules as before based on the bomb positions on the screen in front of you. It should be fairly straightforward, but if you’re struggling, use the image below, just note that the cell that is highlighted needs to be a “1” also, and the puzzle is solved:
Jeb will be saved now once again, and you’re back to the central room, and have one remaining door to go through.
Do a Crate Job
When you first enter this level, turn around and head down the stairs. You’ll see an orange crate. Open it for a “Two” Card and a “Six” Card. Go back up the stairs, and turn left and you’ll see a second orange crate in front of you. Open it for another “Two” Card and a “Five” Card. Keep going up the stairs for another crate with a “Seven” Card” in it. Go back down the stairs, turn around and head to the orange checkerboard with a console in front of it.
This machine moves like a crane, and you need to pick up the crates, by moving the crane the right number of squares up, right left or down. You use the numbered cards you’ve found to instruct the crane.
For the first crate do the following:
Up: 2 Card
Right: 2 Card
The crane will grab the crate, and you can open it for a Logic Wheel.
For the next crate, remove all the cards, and then do the following:
Up: 7 Card
Right: 5 Card
Down: 6 Card
And again grab the Logic Wheel from your new crate. For the final crate, remove the cards and then do the following:
Up: 6 Card
Right: 5 Card
Down: 2 Card
Left: 2 Card
This will reward you with your third and final Logic Wheel.
Help Jeb of the Hook!
Now head up to the top of the stairs again and you will see another console you can interact with. Place all three Logic Wheels onto the console. You will see that these will be Yellow, Red and Blue.
Now the thing to pay attention to is the direction of the arrows, because we want the net result of all 12 arrows across the 3 Logic Wheels to get us to the desired spot, indicated by a Padlock icon on the grid screen to the right.
You can rotate each Logic Wheel to change all of the arrow directions per wheel at a time. At any point if you want to check if you have solution correct, pull the lever in the bottom right of the console. If you’re struggling the solution is as follows:
Yellow Wheel
UP, RIGHT
RIGHT, LEFT
Red Wheel
DOWN, UP
RIGHT, RIGHT
Blue Wheel
UP, RIGHT
UP, DOWN
Then pull the level and you will have saved Jeb.
Congratulations, thanks to our walkthrough you’ve finished Into the Capture Dimension in the Escape Academy DLC.


